


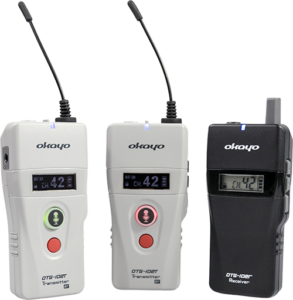
Okayo OTG-102
Instructions
General Instructions
1. Before starting the tour guide system
- Ensure that a microphone or headset is connected to the transmitter and an earphone to the receiver. Check that the microphone/headset/earphone plug is properly inserted into the jack.
- Ensure that disposable batteries are correctly inserted or Ni-MH rechargeable batteries are charged in each device (+ to +, - to -). For systems with a built-in battery, check its charge level.
2. Correct startup of the tour guide system
- Start by turning on the transmitter (or transmitters, if the system allows more than 1 transmitter to operate on the same channel) and selecting the desired transmission channel.
- If the transmitter has a microphone sensitivity adjustment setting, check that it is not too low. This also applies to the "mute" function.
- Then turn on all receivers. The transmission channel should be set manually or via channel synchronization (if available in the model) to the same channel as the transmitter.
- Check that the volume on the receivers is not too low.
⚠ Important
Most popular tour guide systems allow only 1 transmitter to operate on 1 channel. Turning on 2 transmitters on the same channel will cause interference or no transmission.
3. Power management of the tour guide system
3.1. Disposable batteries
- One battery bar on the display or a red LED on the device indicates a low battery level. At this point, the batteries should be replaced with new ones, as the device will operate for a maximum of 1 hour.
- If the batteries discharged too quickly, insert new ones and check their operating time, or you can try inserting batteries from a different manufacturer.
- Low or high temperatures can affect battery life.
3.2. Rechargeable and built-in batteries
- One battery bar on the display or a red LED on the device indicates a low battery level. At this point, the device should be placed in the charger (if the device has a micro USB input – it can be charged via a USB cable).
- Devices with rechargeable batteries are best charged 1 day or a few hours before planned use.
- The charging time for rechargeable batteries in a special charger depends on the model and the discharge level of the battery. For a completely discharged battery, the charging time ranges from approximately 5h to 12h for the highest capacity batteries. Leaving devices in the charger overnight does not cause overcharging or any damage to the equipment.
- Remember to periodically replace worn-out rechargeable batteries with new ones. Depending on the manufacturer and capacity of the batteries, cycles (cyclic discharge and charge) can range from 500 to 1500.
⚠ Important
It is not recommended to connect more than one charger to an extension cord.
4. Transmission interference / no transmission - possible solutions
- Check if the transmitter/receiver is turned on.
- Check if the transmitter and receiver are on the same channel.
- Check if the transmitter/receiver is not muted.
- Check if 2 transmitters are not operating on the same channel.
- Check the transmission quality on another channel.
- Check if the microphone/headphones are not damaged – test the receiver with an earphone and the transmitter with a microphone that you are sure are working correctly.
- Check if the battery is not discharged - test the device with a battery/rechargeable battery that works in another device (you are sure it is not discharged).
- Restart the tour guide system (turn off and on again).
Quick Guide for Okayo OTG-102
1. Select settings for the OTG-102T transmitter
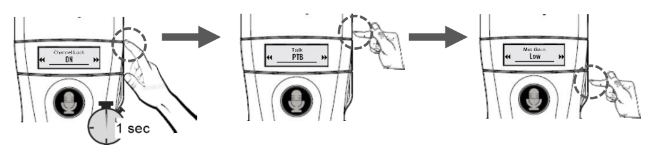
- Check if the transmitter is programmed for EU or US frequency. There should be a sticker in the battery compartment with the designation C416 for EU, D119 for US.
- Enter the transmitter's settings panel by simultaneously pressing the ▲ and power buttons on the side of the transmitter.
- Select the setting using ▲▼. Confirm by pressing the power button.
- Select the following settings for the OTG-102T transmitter:
- Channel Lock – ON
- RF Power – LOW for EU transmitter, HI for US transmitter
- Audio Priority – OFF
- ADNR – OFF
- Mic. Gain – 3
- Set RX Off – OFF
- Okayo Connect – ON
- After selecting the last setting, the device will automatically turn on.
- Then turn off the transmitter by holding the power button until the display turns off.
- If you want to use a second transmitter to communicate with the group, start it according to steps 1 ~ 6.
2. Default setting of the OTG-102R EUUS receiver
- If you are unsure what options can be set in the OTG-102R receivers, restore the default settings.
- Press the ▲▼ and power buttons simultaneously. The receiver will turn on again, and the following information should appear on the display: G88 88, C416 OR D119. This means that the receiver has been restored to default settings.
3. Synchronization of OTG-102R EUUS receivers to the OTG-102T transmitter
- All devices must be turned off before synchronization.
- On the transmitter, set the switch to position T1.
- The transmitter and receivers must be next to each other during synchronization. Max. distance of the receiver from the transmitter is 2 m.
- Simultaneously press the red CALL button on the front of the transmitter and the power button on the side of the transmitter.
- Use the ▲▼ buttons to select the channel (within 3 seconds), then confirm the selection by pressing the power button.
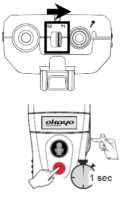
The LED on the transmitter starts flashing. The transmitter begins sending a pairing signal to the receivers.
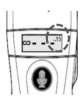
- Now turn on the receivers one by one by pressing the power button.
During synchronization, the receiver changes its frequency band to EU or US (this depends on the transmitter's frequency band).
The individual ID number will appear on the receiver's display.
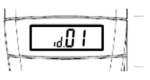
- If you want to work with two transmitters on the same channel, start the second OTG-102T transmitter according to point "1. Select settings for the OTG-102T transmitter" and "3. Synchronization of OTG-102R EUUS receivers". Perform all steps except turning on the receivers.
- The second OTG-102T transmitter, set up in the same way as the first transmitter and on the same channel, will retrieve the list of synchronized receivers.
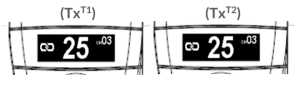
- Briefly press the red CALL button on the front of the transmitter (if you have turned on 2 transmitters, press CALL on both transmitters). The receivers have been synchronized with the transmitter. The devices are ready for operation.
⚠ Note
If two transmitters are turned on, remember to set the switch on the second transmitter to position T2 after synchronization is complete.
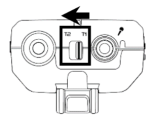
- Transmitters and receivers remember synchronization and operation settings after being turned off and on again. The next time the set is turned on, simply turn on each device with the power button.
⚠ Note
If you want to create a set consisting of other OTG-102R receivers or OTG-102T transmitters (EU or US), you must repeat the receiver synchronization operation to the transmitter.
- If the microphone button glows red, it means the transmitter is muted. Briefly press the microphone button. The button will light up green, indicating that the microphone is on.
- On the side of the receiver housing, there is a volume potentiometer that adjusts the sound reception volume. Pay attention to the position of the potentiometer.
4. Connecting the microphone to the transmitter and the earphone to the receiver
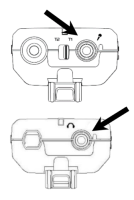
- The microphone jack on the transmitter is located next to the T1/T2 switch. Connect the microphone to it.
- The earphone jack on the receiver is at the very top of the receiver next to the antenna. Connect the earphone to it.
5. Changing the channel during OTG-102 system operation
- Synchronizing the group allows, among other things, searching for an interference-free channel with automatic channel change in all receivers.
- Press and hold the microphone and CALL buttons on transmitter T1 simultaneously. An interference-free channel will be searched for and selected for all receivers within transmission range.
⚠ Note
Transmitter T1 will start in "Roll-Call" mode to monitor the status of channel changes in the receivers.
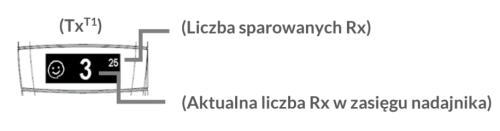
- Wait a moment for the transmitter to count all receivers within its range.
- Briefly press the CALL button to end the operation.
- On the second transmitter T2, select the same channel manually.
⚠ Note
If any receivers were out of range of the transmitter or were turned off during the operation, their channel must be manually changed to the one found by the transmitter.
6. Managing device operating time
- The Okayo OTG-102T US Ready transmitter operates for approx. 15 hours on a set of batteries.
- The Okayo OTG-102R US Ready receiver operates for approx. 45 hours on a set of batteries.
- Before starting to use the communication system, check the battery charge level. The battery charge status is indicated by the display indicator or the LED on the device.

7. Turning devices off / on
- Press and hold the power button for 3 seconds on the device to turn it off or on.
- Receivers will automatically turn off after 20 minutes if they do not receive a signal from the transmitter (option can be disabled in the receiver settings panel).
8. Troubleshooting
8.1. The transmitter screen displays NO DATA
8.2. The transmitter screen displays NOT APPLICABLE
Option available only after successful pairing of devices with access to advanced options for the transmitter set to T1.
8.3. The transmitter screen displays VOICE DETECTING
To improve the listening experience, this screen appears on the transmitter every time it is turned on.
8.4. Why can't transmitter T2 get the list of paired devices from transmitter T1?
- Check if the selected channels on both transmitters are the same.
- Check if the T1/T2 switch on transmitter T2 is set to T1 according to the instructions in the section Pairing transmitter T1 with transmitter T2.
- Restart transmitter T2.
8.5. Why doesn't the alarm triggered by transmitter T1 activate on the receiver?
- Check if the receiver is turned on.
- Check if the receiver is on the list of paired devices in transmitter T1.
- Check if the receiver is within range of transmitter T1.
8.6. Why doesn't the out-of-range alarm trigger on the receiver?
Check if the alarm is enabled in the receiver settings panel.
8.7. Why doesn't the receiver hear the transmitter?
- Check if the earphone is properly inserted into the receiver.
- Check if the volume knob on the receiver is set correctly.
- Check if the transmitter is muted.
- Check if the channels on the transmitter and receiver are the same.
- Check if the receiver is within the transmitter's transmission range.
- Check the receiver's LED status.
- Check if the receiver is synchronized with the transmitter.
8.8. Why is there a problem with the transmitter?
- Check if the microphone is properly inserted into the transmitter.
- Check if the transmitter is muted.
- Check if you only have two transmitters turned on on the same channel, and the switch is set to T1 for the first transmitter and T2 for the second transmitter.
- Check the volume level in the transmitter's settings panel.
- Decrease or disable the ADNR option in the transmitter's settings panel.
- Check the transmitter's LED status.
- Use the interference-free channel search function and change the group channel.
Okayo OTG-102 User Manual
1. Device Diagram
Transmitter (Tx)
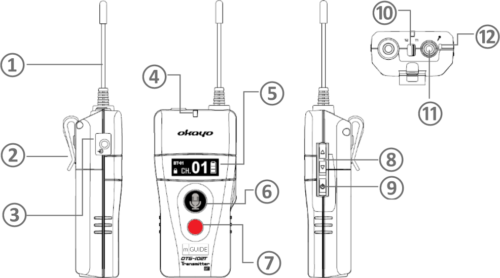
- Tx antenna
- Belt clip
- Aux-in jack 3.5 mm (TRS)
- LED
- 0.91” OLED display
- TALK button
- CALL button
- Up / Down buttons (▲▼)
- Power button (on / off)
- T1 / T2 switch*
- Microphone jack 3.5 mm TS
Receiver (Rx)
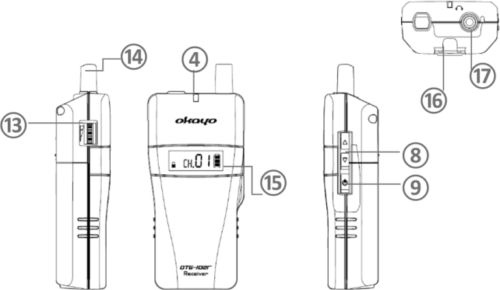
- Built-in microphone
- Volume knob
- Rx antenna*
- 0.91” LCD display
- Lanyard clip
- Headphone jack 3.5 mm (TRS)
⚠ Note
The receiver (Rx) also works if only one battery is used, but it cannot be placed in chargers with only one battery installed. Remember that this battery must be in the assigned compartment (No. 1).
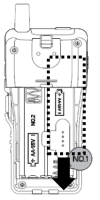
* Transmitter T1 in the user manual refers to the main transmitter, Transmitter T2 is the auxiliary transmitter. Pay attention to the T symbol next to the transmitter in the user manual. Set the switch on the transmitter according to the user manual. ** The antenna varies depending on the frequency band. Our standard antenna is the EU band version, and it is recommended to adjust the RF power to "Hi" in the Tx settings menu if the Rx switches to the US band for better transmission signal.
2. Transmitter and Receiver Settings Panel
- To enter the panel and change device settings, press and hold the ▲ and power buttons simultaneously to turn on the device. Then use the ▲▼ buttons to select the preferred setting. Confirm the selection by pressing the power button. After confirming the last setting, the device will start automatically.
- Devices remember selected settings after being turned off and on again.
- To restore default device settings, press and hold the ▲▼ and power buttons simultaneously to turn on the device. Once turned on, the device will operate with default settings.
Transmitter (Tx)
| Setting | Option on display | Setting description |
|---|---|---|
|
Channel Lock |
ON / OFF |
Channel lock: on (default) / off |
|
RF Power |
Hi / Low |
Signal output power: 13dB / 10dB (default) |
|
Audio Priority |
ON / OFF |
Priority for aux-in source: on / off (default) |
|
ADNR |
OFF / Low / Mid / High |
Active Dynamic Noise Reduction level: off / low / medium (default) / high |
|
Mic. Gain |
1 / 2 / 3 / 4 / 5 |
Microphone volume level: 1 / 2 / 3 (default) / 4 / 5 |
|
Set RX Off |
ON / OFF |
Remote receiver shutdown: On / off (default) |
|
Okayo Connect |
ON / OFF |
Bluetooth module for connection with OkayoConnect app: On / off (default) |
Receiver (Rx)
| Settings | Symbol on display | Option on display | Setting description |
|---|---|---|---|
|
Channel Lock |
|
ON / OFF |
Channel lock: on (default) / off |
|
Auto power off |
|
ON / OFF |
Automatic receiver shutdown after 20 minutes without signal from transmitter: on (default) / off |
|
Auto power on |
|
ON / OFF |
Automatic receiver power-on after leaving the dedicated bulk charger: on / off (default) |
|
Earphone out |
|
Hi / Lo |
Headphone output level. For HAC users, select "Hi" mode: HAC / normal (default) |
|
Alarm |
|
ON / OFF |
Out-of-range alarm: on (default) / off |


3. Selecting simultaneous channels
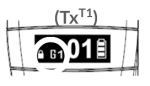
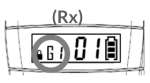
To simplify channel selection, a limited number of simultaneous channels is available (the number is limited by the frequency band for a given region).
- Press and hold the ▼ and power buttons simultaneously to turn on the device.
- Use the ▲▼ buttons to select "G1" and confirm the selection by briefly pressing the power button.
4. LED Indicators
| Setting | Option on display |
|---|---|
|
Blue |
Sufficient battery level |
|
Red |
Battery empty |
|
Constant |
Signal reception |
|
Muted |
No signal |
|
Flashing |
Advanced operations in progress |
5. OTG-102 (EUUS) with advanced options
5.1. Starting the system with access to advanced options
Access to all options offered by OTG-102 (EUUS) is obtained by following the instructions below for pairing transmitter T1 with receivers before starting work with the group.
⚠ Note
Before starting group pairing, check the device settings panel and ensure that the selected settings match your preferences.
5.2. Group pairing (devices must be turned off before operation)
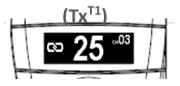
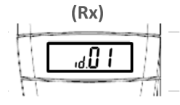
- Press and hold the CALL and power buttons simultaneously on transmitter T1 to turn it on.
- Use the △ ▽ buttons to select the channel within 5 seconds and confirm the selection by briefly pressing the power button.
- The symbol (
 ) appeared on the T1 transmitter display, and the pairing signal is being sent.
 - Turn on the receivers one by one. The receiver changes its frequency band to EU or US (this depends on the T1 transmitter's frequency band). Each receiver receives a unique ID code (important for identification in the Bluetooth "OkayoConnect" application).
- Transmitter T1 can send a pairing signal to the second transmitter before the pairing process is complete (see the point below "Pairing transmitter T1 with transmitter T2").
- After pairing all receivers and the second T2 transmitter, press the CALL button on transmitter T1 to complete the operation.
5.3. Pairing transmitter T1 with transmitter T2
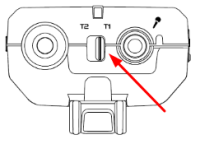
- Before turning on the second transmitter, set its switch to T1.
- Press and hold the CALL and power buttons simultaneously to turn it on.
- Select the same channel number as transmitter T1 and confirm the selection by briefly pressing the power button.
- The second transmitter receives the pairing signal from the first transmitter after confirming the channel number.
- The information on the second transmitter's display should be identical to that on transmitter T1. Information about paired devices in the group has been successfully saved in both transmitters.
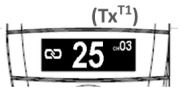
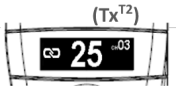
6. Briefly press the CALL button on both transmitters to complete the operation.
⚠ Important
After pairing the transmitters, the T1/T2 switch on the second transmitter must be set to position T2.
5.4. Checking receiver ID number
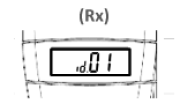
Functions available only for the transmitter with the switch set to T1 => see device diagram.
Briefly press the ▲ button, and the receiver's display will show the assigned ID number.
5.5. Checking group member presence (Roll-Call)
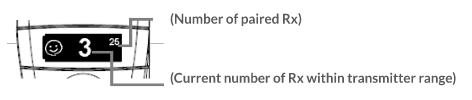
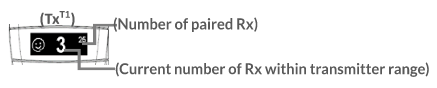
- Briefly press the CALL button on transmitter T1 to check the presence of group members on your list of paired devices.
- The Roll-call symbol (
 ) will appear on the display and the numbers indicated below in the diagram.
 - Briefly press the CALL button to end the operation.
5.6. Calling group members (Alarm)
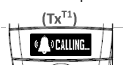
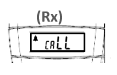
- Press and hold the CALL button on transmitter T1 for 3 seconds to activate the alarm.
- Receivers start vibrating (for 30 seconds), and the "Call" symbol will appear on their displays.
- Briefly press the CALL button to turn off the alarm transmission. On the receiver, press any button to turn off the alarm.
5.7. Remote channel change in receivers
- Press and hold the TALK and CALL buttons on transmitter T1 simultaneously. An interference-free channel will be searched for and selected for all receivers within transmission range (transmitter T1 is in "Roll-Call" mode to monitor the status of channel changes in receivers).
- Briefly press the Call button to end the operation.
- On the second transmitter T2, select the same channel manually → see the section Manual channel change on the device.
5.8. Remote receiver shutdown
Ensure that the (Set RX Off) option is active in the T1 transmitter's settings panel before starting group operation. Press and hold the power button on transmitter T1 for 3 seconds to turn off both the transmitter and receivers simultaneously.
6. General operating principles
6.1. Turning the device off / on
- Press and hold the power button for 3 seconds on the device to turn it off or on.
- Receivers will automatically turn off after 20 minutes if they do not receive a signal from the transmitter.
6.2. Manual channel change on the device
- Press and hold the ▲ and ▼ buttons simultaneously to unlock channel change (the 🔒︎ symbol on the display will disappear).
- Use the ▲▼ buttons to select the next channel and confirm the selection by pressing the power button.
6.3. Muting the microphone on the transmitter
- Briefly press the TALK button on the transmitter to mute / unmute the microphone.
- Green color – ON, Red color – OFF.
6.4. Changing microphone volume on the transmitter
This option is available in the transmitter's settings panel before use. See the section "Device settings panel."
6.5. Activating two transmitters on the same channel
- This system allows a maximum of 2 transmitters to broadcast on the same channel.
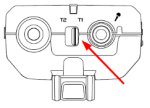
- On the second transmitter, set the switch to T2.
- Turn on transmitter T2 and manually select the same channel as on transmitter T1. The channel on transmitter T2 can be selected before or after pairing transmitter T1 with the receivers.
- If transmitter T1 is turned off, you can change the switch on transmitter T2 to T1 to restore the signal to the receivers.
6.6. Changing earphone volume on the receiver
Turn the volume knob on the receiver to change the receiver's volume.
⚠ Note
Listening at high volume levels for extended periods can damage your hearing.
6.7. Earphone option – Hearing Aid Compatible
The volume level can be adjusted for hearing aid users in the receiver's settings panel (EP – Hi). We recommend selecting this option before starting system operation.
6.8. Transmitting audio source to receivers
- Connect an external audio source to the Aux-in jack on the transmitter with a 3.5 mm TRS (stereo) jack cable.
- By default, audio from the aux-in jack mixes with the microphone on the transmitter.
- You can prioritize the external audio source in the transmitter's settings panel (Audio Priority - ON).
6.9. Out-of-range alarm
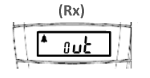
The receiver starts vibrating (30 seconds), and the "out-of-range" message will appear on the display if the signal from the transmitter is lost after 3 minutes.
6.10. Pairing devices without access to advanced settings [devices must be turned off before operation]
- Press and hold the TALK and power buttons simultaneously on transmitter T1.
- A flashing channel number appears on the display. Use the ▲▼ buttons to select the channel and confirm the selection by pressing the power button.
- Transmitter T1 sends a pairing signal.
- Then turn on the receivers one by one by pressing and holding the power button for 1 second to receive the pairing signal from transmitter T1.
- Receivers will change their frequency band to EU or US (this depends on the transmitter's frequency band), and the same channel number as on transmitter T1 will appear on their displays.
- To complete the pairing process, briefly press the TALK button on transmitter T1.
7. OkayoConnectTM Application
⚠ Note
Ensure that Bluetooth connectivity is enabled simultaneously on your smartphone and in the T1 transmitter's settings panel (Okayo Connect) before launching the application.
- Scan the QR code or download the OkayoConnect app from your app store: Click here to download the Android app or click here to download the iOS app
- Launch the app, click on "Okayo Connect" and select the transmitter from the list of available devices (the BT number displayed on transmitter T1 is the same as in the list of available Bluetooth devices in the app).
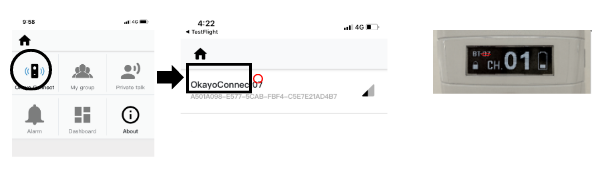
3. After connecting to the transmitter, you can start using the OkayoConnect app.
My group: Allows you to add and edit information about group members.
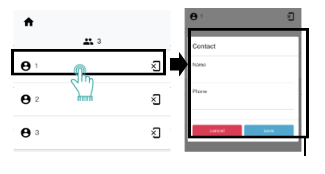
Private talk: Allows transmitter T1 to select one of the group members and speak to them privately.
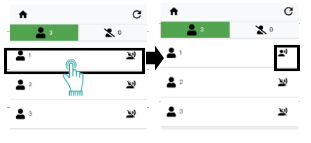
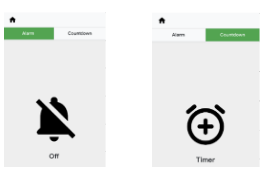
Alarm: Allows remote activation of an alarm or setting a pre-scheduled alarm.
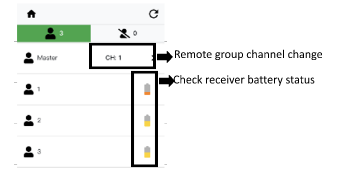
Dashboard: Allows remote changing of the group channel and checking the battery status of receivers.
8. Troubleshooting
8.1. The transmitter screen displays NO DATA
No devices paired. Pair your group before starting operation.
8.2. The transmitter screen displays NOT APPLICABLE
Option available only after successful pairing of devices with access to advanced options for the transmitter set to T1.
8.3. The transmitter screen displays VOICE DETECTING
To improve the listening experience, this screen appears on the transmitter every time it is turned on.
8.4. Why can't transmitter T2 get the list of paired devices from transmitter T1?
- Check if the selected channels on both transmitters are the same.
- Check if the T1/T2 switch on transmitter T2 is set to T1 according to the instructions in the section Pairing transmitter T1 with transmitter T2.
8.5. Why doesn't the alarm triggered by transmitter T1 activate on the receiver?
- Check if the receiver is turned on.
- Check if the receiver is on the list of paired devices in transmitter T1.
- Check if the receiver is within range of transmitter T1.
8.6. Why doesn't the out-of-range alarm trigger on the receiver?
Check if the alarm is enabled in the receiver settings panel.
8.7. Why doesn't the receiver hear the transmitter?
- Check if the earphone is properly inserted into the receiver.
- Check if the volume knob on the receiver is set correctly.
- Check if the transmitter is muted.
- Check if the channels on the transmitter and receiver are the same.
- Check if the receiver is within the transmitter's transmission range.
- Check the receiver's LED status.
8.8. Why is there a problem with the transmitter?
- Check if the microphone is properly inserted into the transmitter.
- Check if the transmitter is muted.
- Check if you only have two transmitters turned on on the same channel, and the switch is set to T1 for the first transmitter and T2 for the second transmitter.
- Check the volume level in the transmitter's settings panel.
- Decrease or disable the ADNR option in the transmitter's settings panel.
- Check the transmitter's LED status.
- Use the interference-free channel search function and change the group channel.
Instructional Videos
Below you will find instructional videos for the Okayo OTG-102 system.
Okayo OTG-102 Model Presentation
Okayo OTG-102 System Presentation
Interactive Google Slides presentation with an overview of the features of the Okayo OTG-102 tour guide system.
📊 Open presentationThe presentation will open in a new browser tab.