


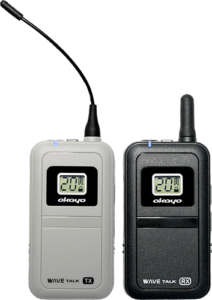
Okayo WaveTalk
Instructions
Additional Materials
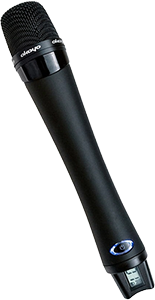
Okayo WaveTalk TK-501H
General Instructions
1. Before starting the tour guide system
- Ensure that a microphone or headset is connected to the transmitter, and headphones to the receiver. Check that the microphone/headset/headphone plug is properly inserted into the jack.
- Ensure that disposable batteries are correctly inserted or Ni-MH rechargeable batteries are charged in each device (+ to +, - to -). For systems with a built-in battery, check its charge level.
2. Correct startup of the tour guide system
- Start by turning on the transmitter (or transmitters, in the case of a system that allows more than 1 transmitter to operate on the same channel) and select the desired transmission channel.
- If the transmitter has a microphone sensitivity adjustment setting, check that it is not too low. This also applies to the "mute" function.
- Then turn on all receivers. The transmission channel should be set manually or by channel synchronization (if available in the model) to the same channel as the transmitter.
- Check that the volume on the receivers is not too low.
⚠ Note
Most popular tour guide systems allow only 1 transmitter to operate on 1 channel. Operating 2 transmitters on the same channel will cause interference or no transmission.
3. Power management of the tour guide system
3.1. Disposable batteries
- One battery bar on the display or a red LED on the device indicates a low battery level. At this point, the batteries should be replaced with new ones, as the device will operate for a maximum of 1 hour.
- If the batteries discharged too quickly, insert new ones and check their operating time, or you can try inserting batteries from a different manufacturer.
- Low or high temperatures can affect battery life.
3.2. Rechargeable and built-in batteries
- One battery bar on the display or a red LED on the device indicates a low battery level. At this point, the device should be placed in the charger (if the device has a micro USB input – it can be charged via a USB cable).
- Devices with rechargeable batteries are best charged 1 day or several hours before planned use.
- The charging time for rechargeable batteries in a special charger depends on the model and the degree of battery discharge. For a completely discharged battery, the charging time ranges from approximately 5 hours to 12 hours for the highest capacity batteries. Leaving devices in the charger overnight does not cause overcharging or any damage to the equipment.
- It is important to periodically replace worn-out rechargeable batteries with new ones. Depending on the manufacturer and capacity of the batteries, cycles (cyclic discharge and charge) can range from 500 to 1500.
⚠ Note
It is not recommended to connect more than one charger to an extension cord.
4. Transmission interference / no transmission - possible solutions
- Check if the transmitter/receiver is turned on.
- Check if the transmitter and receiver are on the same channel.
- Check if the transmitter/receiver is not muted.
- Check if 2 transmitters are not operating on the same channel.
- Check transmission quality on another channel.
- Check if the microphone/headphones are not damaged – test the receiver with headphones and the transmitter with a microphone that you are sure are working correctly.
- Check if the battery is not discharged - test the device with a battery/rechargeable battery that works in another device (you are sure it is not discharged).
- Restart the tour guide system (turn off and on again).
Okayo WaveTalk User Manual
1. Device Diagram
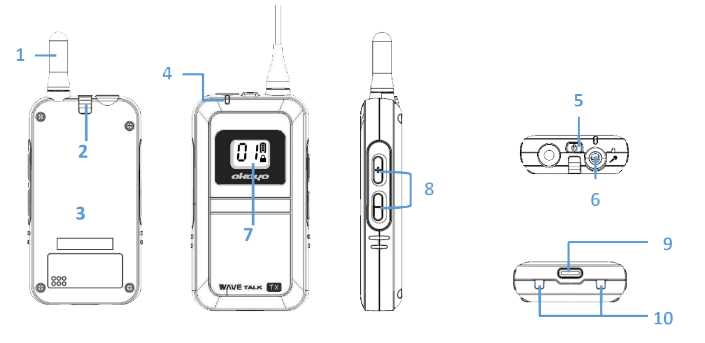
- Antenna
- Lanyard clip
- Built-in rechargeable battery
- Signal / Power LED
- Power / Mute button
- 3.5 mm TS microphone jack (Tx) / 3.5 mm TRS headphone jack (Rx)
- 0.66” LCD display
- Up (+) / Down (−) button
- USB-C charging port (alternative)
- Charging contacts
2. General Operating Principles
2.1. Pairing devices
- Press and hold the “−” and power buttons simultaneously on the transmitter to turn it on.
- Use the “+” and “−” buttons to select a channel and confirm your selection by pressing the power button.
- Then, turn on the receivers one by one to receive the pairing signal from the transmitter. Press and hold the power button on the receiver for 1 second.
- After all receivers are paired, complete the process by pressing the power button on the transmitter.
2.2. Starting devices without pairing
- Press and hold the power button on the device for 1 second to turn it on.
2.3. Manual channel change
- Press and hold the “+” and “–” buttons simultaneously and wait until the 🔒︎ symbol disappears from the display.
- Then, use the 🔒︎, “+” and “−” buttons to select a channel and confirm your selection by pressing the power button.
2.4. Muting the microphone on the transmitter
- Briefly press the power button. The LED on the transmitter will flash.
2.5. Adjusting microphone volume on the transmitter
- Press and hold the “+” button for 2 seconds. Then change the volume (U1~U5) using the “+” or “−” buttons and confirm your selection by pressing the power button.
2.6. Adjusting headphone volume on the receiver
⚠ Note
Briefly press the “+” or “−” button to change the headphone volume.
Warning: listening at high volume levels for a long time can damage your hearing.
2.7. Turning off devices
- Press and hold the power button for 3 seconds.
2.8. Power saving in receivers
- Receivers will automatically turn off after 20 minutes if they do not receive a signal from the transmitter.
3. Advanced Functions
The functions described below are only available if they have been enabled in the device options. See the section below - Device Settings.
3.1. Remote channel change in receivers
- Press and hold the “+” and “−” buttons simultaneously on the transmitter.
- The transmitter begins scanning frequencies for an interference-free channel, which is visible on the displays of the transmitter and receivers.
- After a moment, the channel is changed to a new one on all devices.
3.2. Remote shutdown of receivers
- Turning off the transmitter will immediately turn off all receivers on the same channel.
3.3. Headphone in Hearing Aid Compatible mode
- For HAC users, this headphone jack option can be set as preferred.
4. Device Settings
To enter the device settings panel, press and hold the “+” and power buttons simultaneously to turn it on. Then, use the “+” and “−” buttons to select a specific setting and confirm your selection by pressing the power button. After selecting the settings, the device will automatically turn on.
4.1. Transmitter

Signal output power (Po): Hi / Lo
The signal strength can be set to “Hi” to increase it.

Remote channel change in receivers (Sc): On / Off
The “On” setting automatically searches for an interference-free channel and remotely changes the channel on all devices in the group.

4.2. Receiver

Automatic shutdown (AF): On / Off
The “On” setting causes the receiver to automatically turn off after 20 minutes if it does not receive a signal from the transmitter.

Headphone output (Eo): Hi / Lo
The “Hi” setting puts the headphone jack in Hearing Aid Compatible mode.
4.3. Restore default settings
- Press and hold the “+”, “−”, and power buttons simultaneously to turn on the device.
- The software symbol C with a number will appear on the display, and after a moment, standard information (channel number, battery status) will appear on the display.
4. LED Indicators
| LED Status | Meaning |
|---|---|
|
blue |
sufficient battery level |
|
red |
low battery level |
|
flashing slowly |
microphone muted |
|
flashing quickly |
device pairing |
|
off |
no signal |
5. Charging
USB-C port
Alternative charging of the device via the USB-C port is allowed.
⚠ Note
You can use the device while charging via the USB-C port.
Charging contacts
- When the device is placed in a dedicated bulk charger (C12, C24), the built-in rechargeable battery is charged via the charging contacts.
Instructional Videos
Okayo WaveTalk TK-501H
1. Diagram and User Manual
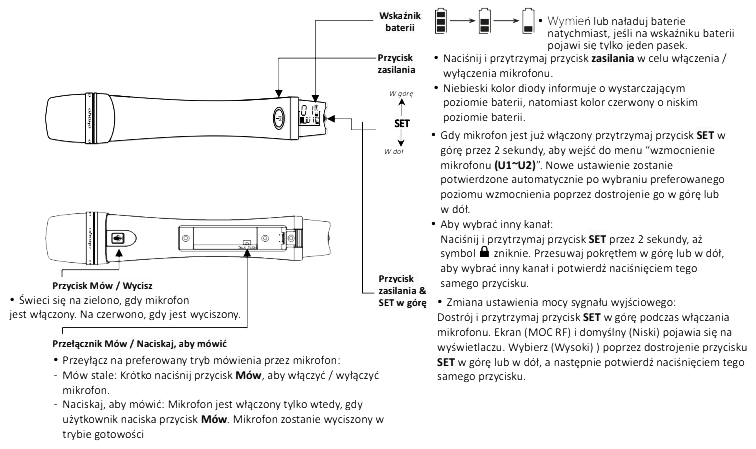
2. Automatic receiver pairing to microphone
- Tune and hold the SET button down while turning on the microphone.
- The channel number will appear on the display and start flashing. Move the dial up or down to select a different channel.
- The newly selected channel will be automatically confirmed after 5 seconds or immediately after pressing the SET button.
- Then the power button will start flashing. This means the microphone is sending a pairing signal.
- Now, turn on all Okayo WaveTalk TK-501R receivers one by one to receive the pairing signal from the microphone.
- When the receiver correctly receives the pairing signal from the microphone, the same channel number as on the microphone will appear on the display, and the LED on the receiver will light up blue or red (depending on the battery level in the receiver).
- When all receivers are paired with the microphone, press the SET button on the microphone again to exit automatic pairing mode.
3. Restore factory settings
To restore factory settings, press the SET and power buttons simultaneously to turn on the microphone.
4. Technical Specification
| Parameter | Value |
|---|---|
|
Microphone type |
condenser |
|
Capsule type |
cardioid |
|
Directional characteristic |
unidirectional |
|
Frequency band |
823 ~ 832 & 863~ 865 MHz |
|
Number of channels |
42 |
|
Emission modulation |
4 GFSK |
|
T.H.D. |
<1.5 % |
|
SNR |
>70 dB |
|
Dynamic range |
>80 dB |
|
Frequency response |
100 ~ 9000 Hz |
|
Signal output power |
10 mW / 20 mW |
|
Power supply |
2 x AA |
|
Operating time |
>13 hours |
|
Transmission range |
Hi (High): 70+ meters, Lo (Low): 50+ meters |
|
Operating temperature |
-10℃ ~ 60℃ |
|
Dimensions |
37 x 200 mm |
|
Weight (without batteries) |
90±5 g |