


User Manual
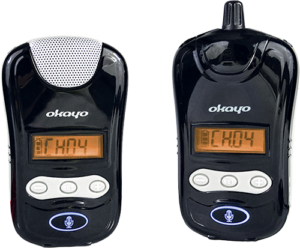
Okayo EJ-5
Instructions
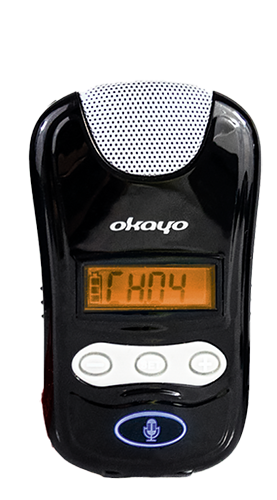
Okayo EJ-5T
Transmitter
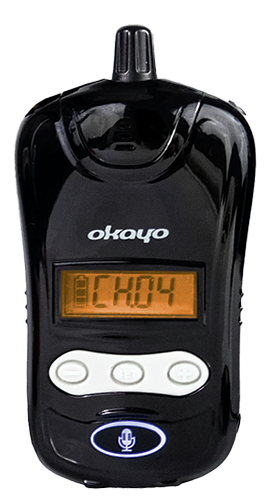
Okayo EJ-5R
Receiver
Okayo EJ-5T User Manual
1. Device Diagram
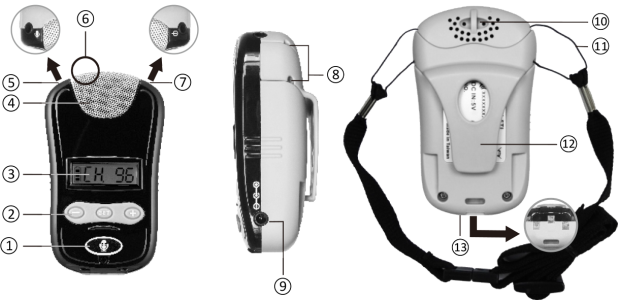
- POWER/MUTE switch (mute indicator)
- Channel/volume level selector switch
- LCD display
- Mesh cover (concealed microphone)
- External microphone connector
- Concealed charging indicator
- External signal connector
- Neck strap opening
- DC charger connector
- Belt clip opening
- Neck strap
- Clip
- Charging connector
2. Configuration / Installation
2.1. Power On
- Press and hold the button for half a second to power on the device and activate the LCD backlight.
- When powered on, the button illuminates blue.
- The device will power on and be ready to receive audio signal within two seconds.
2.2. Power Off
- Press and hold the button for two seconds to power off.
- Powering off will turn off the LCD display and all indicators.
2.3. Channel Selection
- Press and hold the SET button for two seconds to enter channel selection mode.
- Select the desired channel using the + and - buttons while the channel number is flashing. Confirm the selection with the SET button.
2.4. Switching Between Mute / Talk Mode
- Press and hold the Mute button for two seconds to switch between mute mode and talk mode.
- Mute mode is indicated by a red LED, talk mode is indicated by a blue LED.
2.5. Channel Display
Press the SET button to display the currently used frequency.
2.6. Output Power Selection / Maximum Number of Available Channels
- To enter selection mode, press the SET and POWER buttons simultaneously while the device is powered off.
- The LCD display will show the maximum available number of channels: 640-664 MHz, 794-806 MHz, and 863-865 MHz. Select the desired channel using the + and - buttons.
- Confirm the selection using the SET button. The selection will be confirmed automatically if no button is pressed within 5 seconds.
- The LCD display will show the Hi/Lo symbol indicating high/low output power level. Select the desired power level using the + and - buttons.
- Confirm the selection using the SET button. The selection will be confirmed automatically if no button is pressed within 5 seconds.
2.7. Volume Level Adjustment
After pressing the + or - button, the LCD display will show the currently selected volume level (in the range 1 ~ 3).
2.8. Charging Mode (applies to charging in HDC-530, HDC-520, HDC-502 chargers)
- Charging mode is indicated by a red LED.
- Full battery charge is indicated by a green LED.
- Placing the device in the charging dock will power off the device.
- A charging error is indicated by a flashing red LED and battery symbol on the LCD display. There may be several reasons for this:
(1) Battery temperature during charging exceeded 60°C.
(2) Charging time in the charging dock was longer than seven hours.
(3) The battery is damaged.
2.9. Frequency Synchronization
- After powering on, frequency synchronization will occur. If no audio signal is received for ten minutes, the device will power off. During synchronization, the MUTE indicator flashes blue and the LCD backlight is on.
- Pressing the MUTE button after the channel is displayed on the screen will enter synchronization mode. If no audio signal is received for twenty seconds, the device will power off.
- If synchronization is successful, the device will switch to MUTE mode, indicated by a red LED.
- When using a 20- or 30-position charger, synchronization is indicated by a flashing green LED, and then the LCD display will show the current charging status.
- The device can repeat synchronization using the charger.
2.10. Other
To reset the device, press the +/- buttons simultaneously and power on.
Okayo EJ-5R User Manual
1. Device Diagram
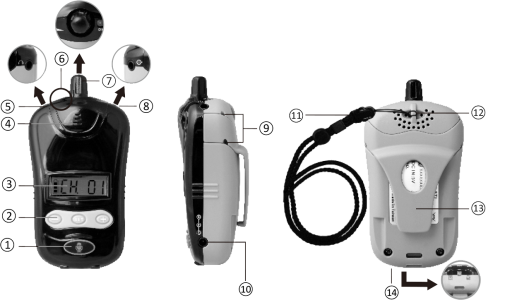
- MUTE switch (MUTE indicator)
- Channel selector switch
- LCD display
- Built-in speaker
- Headphone jack connector
- Charging indicator
- POWER/VOLUME knob
- Line output
- Belt clip opening
- DC charger input
- Neck strap
- Belt clip opening
- Clip
- Charging connector
2. Configuration / Installation
2.1. Power On
- To power on, turn the power knob clockwise.
- After powering on, the available channel number will be displayed.
2.2. Power Off
- To power off, turn the power knob counterclockwise.
- After powering off, the display and all indicators will turn off.
2.3. Volume Adjustment
Adjust the volume by turning the knob in the appropriate direction.
2.4. Channel Display
The currently used frequency will be shown on the display after pressing the SET button.
2.5. Frequency Synchronization
- After powering on, frequency synchronization will occur. If no audio signal is received for ten minutes, the device will power off. During synchronization, the MUTE indicator flashes blue and the LCD backlight is on.
- If frequency synchronization is successful, the device will automatically switch to MUTE mode, indicated by a red MUTE button indicator.
- During synchronization using a 20- or 30-position charger, the green charging indicator will flash at least 10 times. The LCD screen will display the current charging status during this time.
- The device can repeat synchronization using the charger.
2.6. Automatic Power Off
The device will power off automatically if no audio signals are received. This will turn off the LCD display and all indicators.
2.7. Channel Selection
To select the desired channel, use the + / – buttons.
2.8. Switching Between Mute / Receive Mode
- Press the MUTE button to switch between mute and receive modes.
- When receiving a signal, the MUTE mode LED flashes.
- When no signal is being received, the MUTE mode LED illuminates continuously.
- When receiving a signal in receive mode, the MUTE mode LED illuminates continuously in blue.
- When no signal is being received, the MUTE mode LED is off.
2.9. Charging Mode (applies to charging in HDC-530, HDC-520, HDC-502 chargers)
- During charging, the LED illuminates red. After the battery is fully charged, the LED illuminates green.
- After placing the device in the charging dock, the device power will turn off.
- A charging error is indicated by a flashing red LED and battery symbol on the LCD display. There may be several reasons for this:
(1) Battery temperature during charging exceeded 60°C.
(2) Charging time in the charging dock was longer than seven hours.
(3) The battery is damaged.
2.10. Other
To reset the device, press the + / – buttons simultaneously and power on.