


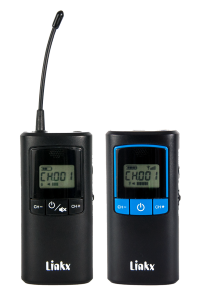
Linkx TG-288
1. Device diagram and instructions
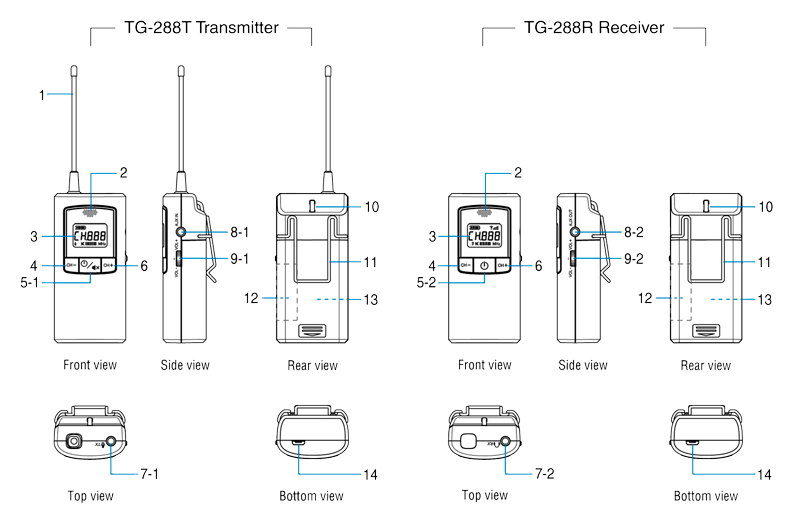
- Antenna
- Built-in microphone
- LCD display
- Down button for channel adjustment
- Power on/off/settings button:
- 5-1. version with mute function
- 5-2. version without mute function
- Up button for channel adjustment
- Audio connectors:
- 7-1. Microphone input
- 7-2. Headphone output
- Aux connectors:
- 8-1. Aux input
- 8-2. Aux output
- Volume control:
- 9-1. Microphone
- 9-2. Headphones
- Lanyard attachment point
- Belt clip
- Label area
- Battery compartment and one AA battery
- Micro-USB charging port
2. LCD display illustration
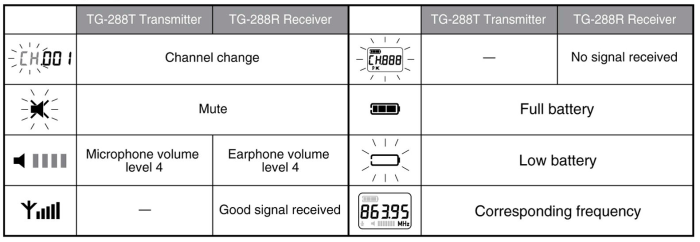
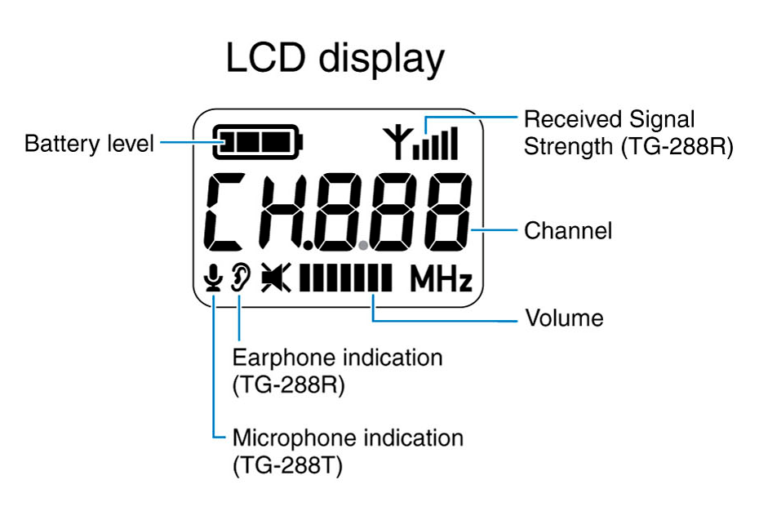
3. Connecting microphone and headphones
The TG-288T transmitter has a built-in microphone, one external microphone-level input (3.5 mm), and one auxiliary-level input (3.5 mm).
You can use the built-in microphone or an external microphone. When an external microphone is connected to the transmitter, the built-in microphone is automatically disabled. When the external microphone is disconnected, the built-in microphone will resume operation. The built-in microphone can only be used in one-way mode
⚠ Note
Ensure that the microphone or auxiliary device is connected to the correct input jack. The microphone will not function properly if connected to the Aux input jack.
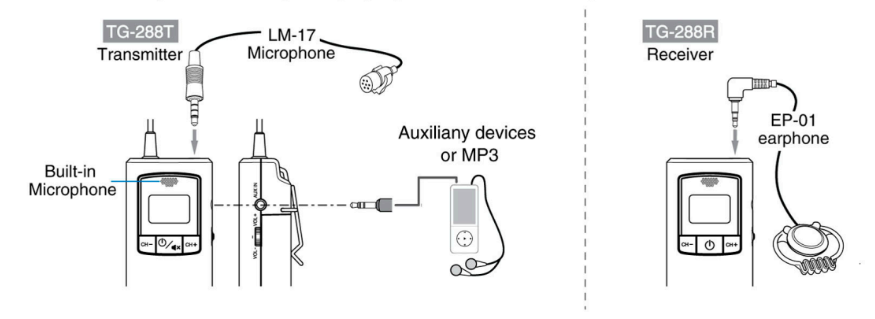
The TG-288R receiver has a separate headphone output (3.5 mm) and auxiliary output (3.5 mm). Connect headphones to the 3.5 mm headphone output or connect a recorder to the Aux output to capture content. Ensure that the connectors are properly inserted into place.
4. Turning power on and off
- Press and hold the power button ⏻ / 🔇︎ for 2 seconds to turn on the system. The LCD display will light up and retrieve the last used channel number to indicate successful power-on.
- Press and hold the power button ⏻ / 🔇︎ for 2 seconds. The LCD display will disappear, indicating complete shutdown.
⚠ Note
Power saving – The receiver will automatically shut down if it does not receive a signal for approximately 20 minutes.
5. Channel selection
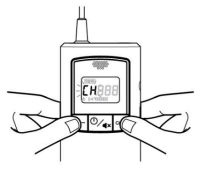
To unlock channel selection, hold both buttons for 2 seconds.
The channel is preset to CH001. If you wish to select a different channel, press the CH- and CH+ buttons simultaneously and hold for 2 seconds. The CH symbol will start flashing; press the CH- or CH+ button to select the desired channel. Press ⏻ / 🔇︎ to confirm the selected channel or wait approximately 5 seconds to automatically save the selected channel.
⚠ Note
Ensure that the transmitter and receiver(s) are operating on the same channel. The 📶︎ symbol will appear indicating that the receiver is receiving a good signal from the transmitter. The receiver display will flash when no transmission signal is received. (Q & A – Q2)
Channel memory
The TG-288 can automatically remember the channel number. When powered on again, it will be set to the last used channel.
Channel SYNC - Automatic channel synchronization between transmitter and receiver
Within the same group, after changing the transmitter channel number, the receiver channel number is wirelessly synchronized to the new channel.
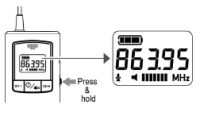
- Press and hold the center of the three-way lever switch on the side of the device; the corresponding frequency will appear on the display.
6. Volume level adjustment
Transmitter
- The transmitter microphone volume level is preset to level 4 🔈︎▮▮▮▮.
- Press the down button VOL- or up button VOL+ to decrease or increase the volume level. There are four volume levels from 🔈︎▮▮▮▮ to 🔈︎▮▮▮▮▮▮▮.
- Press the mute button ⏻ / 🔇︎ briefly to mute the transmitter; press the ⏻ / 🔇︎ button again to restore sound.
Receiver
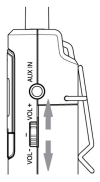
- The receiver headphone volume level is preset to level 4 🔈︎▮▮▮▮.
- Press the down button VOL- or up button VOL+ to decrease or increase the volume level. There are eight volume levels from 🔇︎ to 🔈︎▮▮▮▮▮▮▮.
- The 🔇︎ icon on the LCD display indicates no volume and mute mode.
7. Battery life and charging
- When the battery icon is displayed at full capacity 🔋︎, the battery has sufficient power.
- When the battery icon is displayed as empty and the
 icon is flashing, this indicates low battery level, at 5–10% battery. Replace with a new battery or, if possible, charge it immediately using a USB-certified travel charger (optional accessories) or an appropriate Linkx charging station
 - The charging current is set to 255 mA. For safety reasons, there is a safety timer that will terminate charging after 12 hours of continuous charging. A fully charged battery provides approximately 14 hours of continuous receiver operation and 12 hours of continuous transmitter operation. However, please note that actual battery life depends on user settings, usage patterns, environmental conditions, battery manufacturer, and other factors.
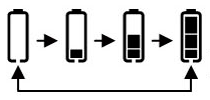
- During charging, the battery icon appears and disappears on the LCD screen:
 .
.
⚠ Note
The transmitter or receiver will automatically shut down during charging. If you wish to use the system while charging, press the power button again to turn the system back on.
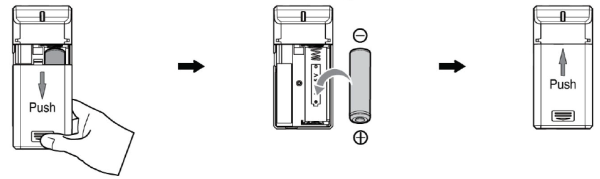
8. Battery replacement
Step 1 Open the battery compartment cover
Step 2 Replace with a new battery.
(Ensure that the battery compartment polarity is correct.)
Step 3 Close the battery compartment cover.
9. Restarting when the LCD display freezes
In the unlikely event that the guide system freezes and stops responding, you can try to force shutdown by removing the battery, then inserting the battery back in and restarting the guide system.
10. Q & A
- The 🔇︎ icon is displayed on the transmitter.
Check whether the transmitter is muted. - My receiver LCD display content is flashing
This indicates that no transmission signal is being received. Ensure that the transmitter is turned on and the receiver is within normal reception range. Both the transmitter and receiver are operating on the same channel and at the same frequency.
⚠ Important
To ensure proper signal reception, position the transmitter and receiver at least 30 cm apart. Placing the system too close will cause immediate saturation of the transmitted signal to the receiver, the system will then collapse, and the receiver will mute.