


User Manual
Linkx TG-201
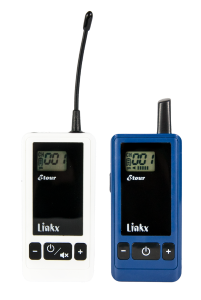
1. Device Diagram and Instructions
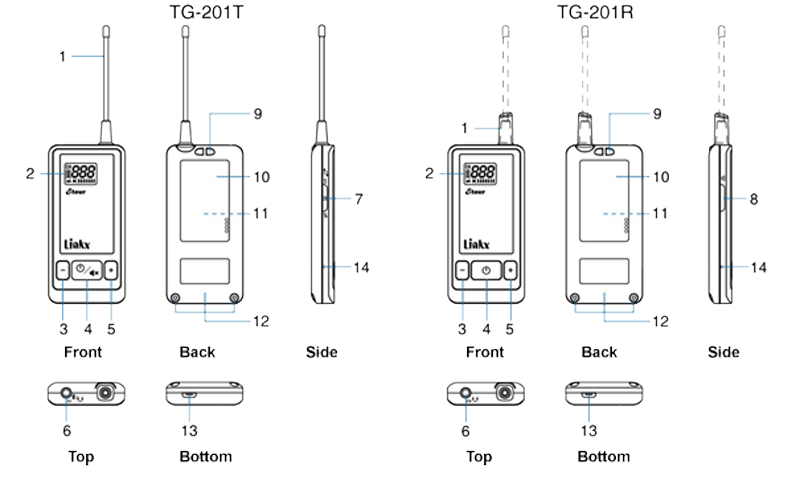
- Antenna
- LCD Display
- Down button for channel change and volume adjustment
- On / Off / Mute / Set buttons – Transmitter; additional function for TG-201T: to mute the audio signal
- On / Off / Set buttons - Receiver
- Up button for channel change and volume adjustment
- Headset / microphone input (transmitter)
- Headphone output (receiver)
- Two-way communication switch (transmitter)
- Talk button (receiver)
- Lanyard attachment point
- Label area
- Battery compartment and built-in lithium-polymer battery
- Battery compartment cover and screws
- Micro-USB charging port
- Force shutdown button
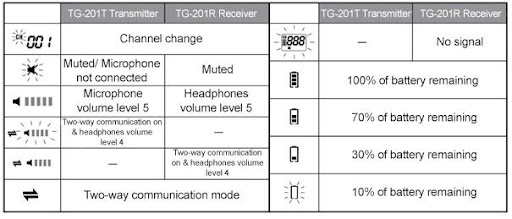
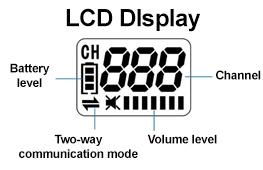
2. Explanation of LCD Display Illustrations
3. Operating Instructions
3.1. Connecting the headset to the transmitter and the earphone to the receiver
Insert the 3.5 mm plug of the headset into the transmitter input (6) and the 3.5 mm earphone plug into the receiver (6). Make sure the plug is fully inserted into the device input.
3.2. Turning the device on and off
- Press and hold the device's power button ⏻ / 🔇︎ for 2 seconds. After turning on, it will show the last used channel. To turn off the device, press and hold the same button for 2 seconds.
- If the receiver does not receive a signal from the transmitter for 20 minutes, it will automatically turn off (battery saving).
3.3. How to change the channel on the receiver and transmitter
- Press buttons (3 and 5) simultaneously and hold for 2 seconds until the symbol starts flashing. Use button (5) or (3) to set the desired channel. Confirm the set channel by quickly pressing the power button (4).
- Ensure that the receiver/receivers and transmitter are set to the same channel. If the receiver is on a different channel and does not receive a signal from the transmitter, its display will flash.
3.4. Automatic channel synchronization
When the channel on the transmitter is changed, the active receivers will automatically synchronize to the transmitter's channel.
3.5. Changing the volume level on the transmitter and receiver
Transmitter
Using buttons (3) and (5), you can set the volume level from 1 to 8 (a flashing volume icon indicates the device is completely muted).
Receiver
- Using buttons (3) and (5), you can set the volume level from 4 to 8.
- A quick press of the power button (4) activates the MUTE function – the volume level indicator will disappear, and a crossed-out sound icon will flash. Pressing the power button quickly again will cancel the mute function.
3.6. Volume level memory
Receivers remember the last set volume level and will resume at that level when turned on again.
3.7. Selection of one-way and two-way communication
- The transmitter allows control over the selection of one-way and two-way communication. When the person with the transmitter speaks, the system allows the receiver holder to join the conversation.
- To enable two-way communication, slide the switch on the side of the transmitter to the ON position (the volume icon will start flashing).
- The receiver holder can join the conversation by pressing and holding the "talk" button on the side of the device (8). Speak into the built-in microphone at the top of the device while continuously holding the "talk" button (other receiver holders will hear the entire conversation).
- Releasing the button on the receiver removes the receiver from the conversation and allows another receiver holder to join the conversation.
- A quick double-click of the "talk" button allows speaking without the need to continuously hold the "talk" button.
- Pressing "talk" again will revert to the previous setting. The OFF position of the slider on the side of the transmitter only allows one-way communication (receiver holders cannot join the conversation).
⚠ Note
Receivers and transmitters automatically turn off during charging. To use the device while charging, you must turn it on again.