


User Manual
Okayo C200
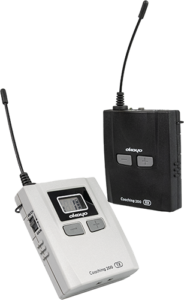
1. Interface
Transmitter (Tx)
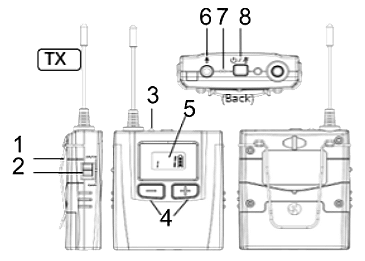
- Belt clip
- Slider: microphone gain (GAIN)/group channel selection (CH/G)
- Signal indicator
- + / − Button
- Display
- 3.5 mm microphone input
- Built-in microphone
- Power button / Mute
Receiver (Rx)
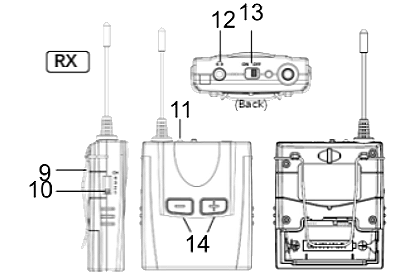
- Belt clip
- Channel switch
- Signal indicator
- 3.5 mm headphone jack input
- Device ON/OFF slider
- + / − Buttons
2. Display
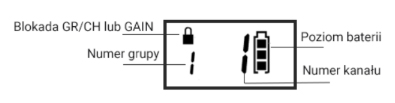
⚠ Low battery level
Replace the batteries when the signal indicator lights up red and the battery icon on the screen shows only 1 bar.
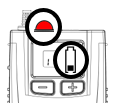
3. Signal indicator
| Status | Transmitter (Tx) | Receiver (Rx) |
|---|---|---|
| Green LED |
Sufficient power |
|
| Red LED |
Low power |
|
| LED blinks |
Muted |
Receiver out of group |
| LED off |
Device off |
|
4. Turning devices ON / OFF
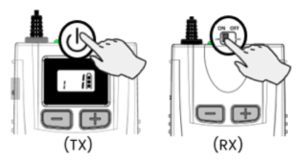
- Transmitter (Tx): Press and hold the power button to turn the device ON/OFF.
- Receiver (Rx): Slide the switch to the ON or OFF position to turn the device ON or OFF. The receiver will automatically turn off if it does not receive a signal from the transmitter for 20 minutes. If this happens, toggle the power switch again to turn the device on.
⚠ Tip
To ensure the best sound quality, we recommend placing the rider's receiver in a visible location, e.g., on the arm or attached to a pocket with a dedicated clip. Avoid placing it under clothing or inside a pocket.
5. Adjusting microphone gain (GAIN) on the transmitter (Tx)
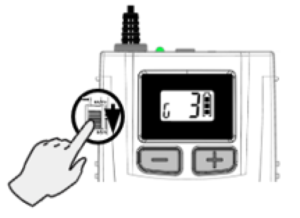
- Slide the slider on the transmitter down to select the GAIN function. Adjust the microphone gain using the +/− buttons (1 ~ 5, default 3), if necessary.
- Slide the slider up to its original position (GR/CH) when you have selected the microphone gain level.
6. Group channel selection (GR/CH) on the transmitter (Tx)
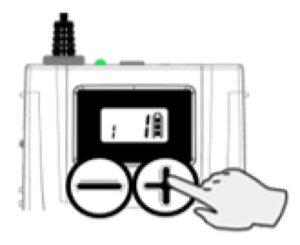
- Slide the slider on the transmitter to the GR/CH function. Select the group number using the +/− buttons (available channels: 1~4).
7. Adjusting headphone volume on the receiver (Rx)
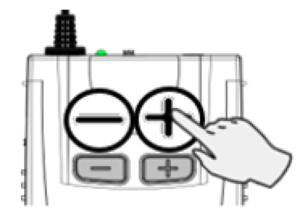
- Press the + or − button to increase or decrease the headphone volume.
8. Selecting the same channel on the transmitter (Tx) and receiver (Rx)
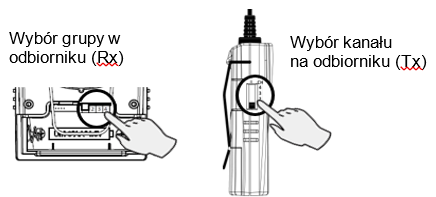
- Open the battery cover on the receiver (Rx). Slide the switch to the selected group number.
- Set the same group number using the slider on the side of the receiver (Rx).
9. Locking / unlocking GR/CH or GAIN functions on the transmitter (Tx)
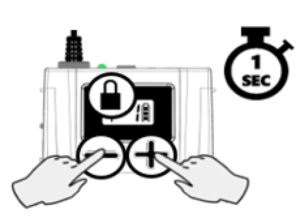
- Simultaneously press and hold the + and − buttons on the transmitter to unlock the group channel selection (GR/CH) or microphone gain (GAIN) functions. Note: both functions will be unlocked simultaneously.
- A padlock icon appears when the GR/CH and GAIN functions are locked. To unlock again, press and hold the + and − buttons simultaneously.
- Functions will be locked or unlocked until manually changed.
10. Muting the microphone on the transmitter (Tx)
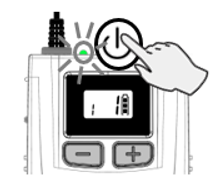
- Briefly press the power button when the transmitter is on to turn the microphone ON/OFF.
- The signal indicator blinks when the microphone is off.
11. Technical specifications
| Parameter | Value |
|---|---|
| Emission modulation |
4GFSK, digital |
| Radio frequency |
500–900 MHz, depending on region |
| Number of channels |
16 |
| Frequency response |
300–3400 Hz |
| Line-of-sight range 1 |
>120 m, depending on region |
| Battery life 2 |
Transmitter: >25 hours |
| Battery |
1× AA battery |
| Dimensions |
61 × 70 × 20 mm, without antenna and belt clip |
| Weight with battery |
approx. 65 g |
1 Range varies depending on environment and country.
2 Battery life depends on usage.